- Stats: 14162 0
- Author: Partyrama
- Posted: 20th October 2015
- Category: Food & Drink
How To Make A Frozen Olaf Birthday Cake
Any parent with small children will be familiar with the film Frozen and its myriad of delightful characters (as well as the annoyingly catchy song “Let It Go”). Since its release in 2013 it has captured the imaginations of boys and girls around the world, leading to a wealth of Frozen merchandise, Frozen-themed birthday parties and, naturally, Frozen cakes.
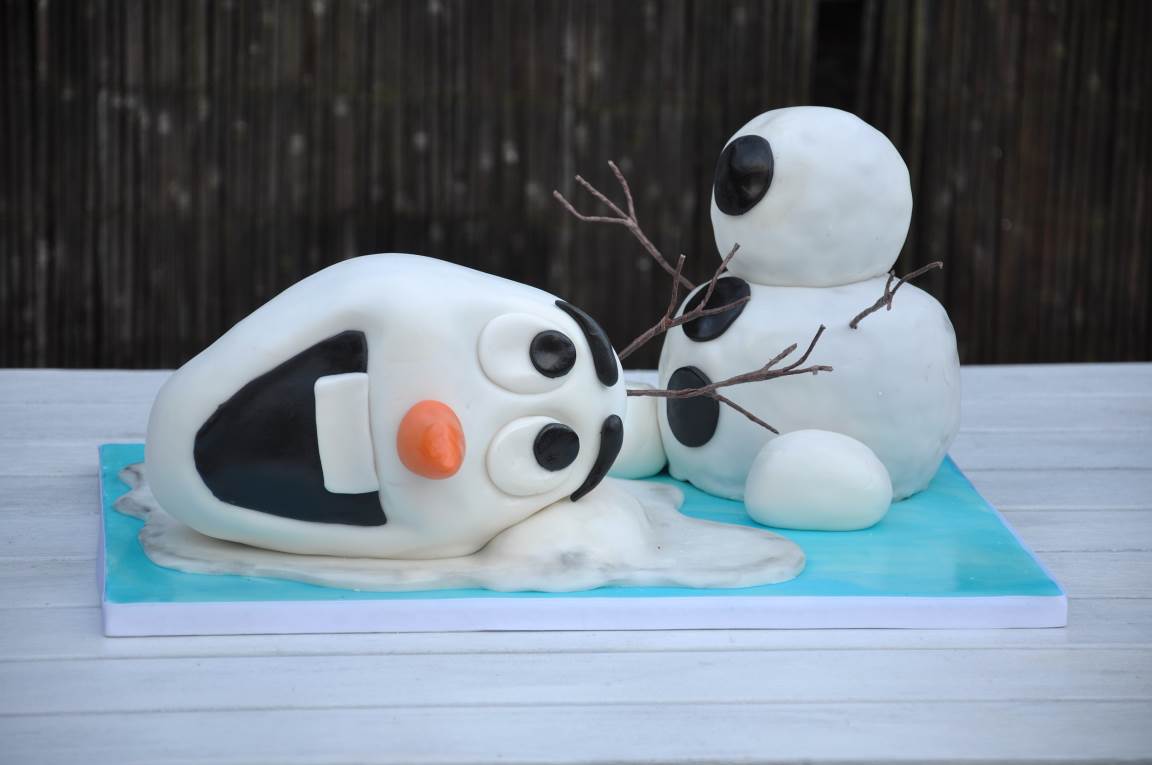
This Frozen cake with Olaf’s head toppling off his body feeds around 30 people and would make a cracking centrepiece at any child’s birthday party themed with our Frozen party accessories. It’s actually easier than it looks – it’s often harder to model the finer details on tiny figurines than it is to carve a whole character out of cake. If you follow this guide then you’ll have no trouble wowing your party guests!
Ingredients and Materials
For the Cake (you will need to make two quantities of this approximately)
- 400g caster sugar
- 400g unsalted butter, softened
- 8 eggs
- 350g self raising flour
- 50g cocoa powder
- 1 tbsp vanilla essence
For the Buttercream Icing (you will need to make one to two quantities approximately)
- 250g unsalted butter, softened
- 500g icing sugar, sifted
- 100g double cream
- 200g dark chocolate – either buttons or chopped into small pieces
For Royal icing
- Approx 250g icing sugar sifted
- 1 egg white
- For the cake decoration
- Approx 3.5kg white fondant icing
- 250g black fondant
- Orange food colour paste
- Black dusting powder or airbrush colour
- Blue liquid food colour
- Isopropyl Alcohol or a clear alcohol such as gin of vodka
- CMC/Tylose Powder
- 14” x 18” cake board
- Four small posy pics
- 24 gauge wire and brown florist’s tape
- Bamboo skewers
- Brownie tins (approx. 12” long by 7” wide)
- 6” round tins
- Circular cutters
- Trex or other vegetable fat
- Cool boiled water
- Non-toxic glue stick
The Cake
The first thing you need to do is make the cake itself! I chose a chocolate cake recipe here, because who doesn’t like chocolate cake?! It’s also a little firmer than plain sponge, which makes it easier to carve if you are new to it. You will need to mix around two quantities of cake for all the tins required.
I generally always make more cake than I actually need but it’s better to have plenty of cake to work with – in any case, the leftovers generally get eaten as we work in the kitchen.

- Grease and line with baking parchment three 6” round tins and three brownie tins. Don’t worry if you don’t have enough tins; just rotate the ones you have. Pre-heat the oven to 180°C (160°C for fan assisted ovens).
- Beat the butter and sugar together until pale and fluffy. If possible, use a standing mixer for this – if not, be prepared to put some elbow grease into it!
- Add in the eggs and vanilla essence a little at a time, beating well between each addition. If the mixture begins to curdle, add a tablespoon of the flour.
- Add the flour and cocoa powder on a slower speed and mix until well combined but don’t beat it.
- Divide the mixture evenly between the tins (it should be about 1” deep in the tins) and bake in the oven for approximately 30-45 minutes or until well risen and a knife inserted comes out clean.
- Allow to cool, then turn out onto wire racks and remove baking parchment.
The Buttercream
This dark chocolate ganache buttercream is definitely one of my all-time favourites. Don’t be deterred by the use of dark chocolate in a kids’ cake – there’s still plenty of sweetness from the icing sugar.
- Beat the butter with the icing sugar, either by hand or in the bowl of a standing mixer until light and fluffy. Set aside.
- Put the cream and the dark chocolate into a microwavable bowl. Microwave it for 30 seconds at a time on a medium setting, stirring in each time until the chocolate has melted and is well mixed with the cream, creating a smooth and glossy sauce. You don’t want to overdo it or the mixture may split.

- Combine the buttercream and the ganache until you have a lovely rich chocolate buttercream. You can add as little or as much ganache as you like depending on how chocolatey you want it.
The Royal Icing
- Separate the egg yolk from the egg white.
- Sift in icing sugar until the desired consistency is reached. This should be soft peak consistency where if you touch the icing with the back of a spoon it will pull into a peak and flop over but hold its shape.
- Cover the bowl with a damp cloth until you are ready to use it.
Layering the Cakes
Once the cakes are totally cool and the buttercream is made you can layer them up ready for carving. You might need to level them a little if they have domed up a lot – you can do this with a serrated knife.

- Take a 6” round cake and spread it with some buttercream, stack the second 6” round on top and then repeat with the third round.

- Follow the same process with the cakes from the brownie tins.
- Don’t worry about getting them perfectly level. They are going to be carved into different shapes so it doesn’t matter at this stage.
- Once the cakes are put together, pop them in the fridge for a few hours to harden up ready for carving.
Constructing Olaf
Now you’re ready to start making Olaf himself!
Bottom half
- First take the 6” round cake and gradually carve bits off it until you’ve created a more rounded shape. This will form the bottom part of Olaf’s body.
Top half
- Take the brownie tin cake and cut into two so one half is approx 8” long and the other 4” long.
- Take the 4” section and trim it again until you have carved another spherical shape with a flatter bottom. This will form the top part of Olaf’s body.
Head

- Take the longer section of the brownie tin cake, which will form Olaf’s head. You essentially need to create a diamond shape out of this piece of cake. Carve it carefully – it’s far easier to cut away than add back in!
- Once you have the basic diamond shape you can turn it on its side to get a better idea of how it will look. Then you can start to add in more sculpting detail, curving the head a little and creating a sausage shape for the nose.
Covering

- Once you are happy with the shape you have achieved, cover all three cakes in buttercream and return to the fridge to harden up for an hour.
Covering Olaf’s Body
- Remove the cakes from the fridge and smooth the surfaces of all three with vegetable fat, rubbing away any obvious buttercream ridges.
- Dust the work surface lightly with cornflour. Roll out white fondant to around 5mm thick.

- Lay the fondant over the larger of the two balls and gradually smooth it into place, pulling it out and smoothing out the creases as you go. Don’t press too hard or the cake underneath may show through. Cut away the excess with a knife and push the edges underneath the sphere using a thin cake smoother or a piece of card. Smooth the fondant and any imperfections with the cake smoother or the palm of your hand.
- Repeat steps two to four to cover the smaller ball. Again use a little royal icing to fix it straight on top of the body.

- Take two lumps of white fondant approximately 150g each and mould into balls, which are squared off a little, for Olaf’s feet. Push them up against Olaf’s body. You can use a little water to secure them if you wish.
Covering Olaf’s Head
This is perhaps the trickiest bit to cover but once it’s done you’re not far off finishing the cake.
- Dust the work surface lightly with cornflour and roll out some white fondant to a thickness of 5mm. Place the head on the fondant and cut around the outline. Remove the excess fondant and press the fondant underneath the head into place.

- Roll out more fondant, but this time place it over the front of the face, smoothing it into place on the front and the sides.
- Spread a generous amount of royal icing where the head will go on the board and immediately lay the head in place. Now you can return to the joins at the back and smooth them into place.

- You can then lightly press into the fondant to create spaces for the eyes and for the mouth.
Adding in the Detail

- Roll out some white fondant to 2-3mm thick and cut out two circles. Using your hands, gently elongate the circles to fill the eye sockets. Fix in place with a little cool boiled water.

- Roll out some black fondant to 2-3mm thick. Cut out two smaller circles for the pupils and fix on top of the white eye sockets with water. Cut another three larger circles for the buttons and fix to the cake with water.
- Roll more black fondant and cut out a triangular shape for the mouth, holding it against the face to ensure you have the right shape. Use water to fix it into place and gently smooth the edges.

- Roll two small grape-sized lumps of black, then elongate them into worms that taper off at one end. These are Olaf’s eyebrows. Fix them to his face with water.

- Roll a small rectangle of white for Olaf’s teeth and fix to his face with water.

- Insert two bamboo sticks into Olaf’s face where his nose will go. Take a small amount of white fondant and colour it with some orange paste until you reach the desired shade. You can also add in a pinch of CMC/Tylose powder to help strengthen the nose.

- Once you have the desired colour roll it into a cone shape for the nose, gently push it onto the skewers and allow to dry.

- To make the arms and twigs coming out of his head, take several pieces of 24 gauge wire and wrap it in brown florist’s tape. Cut it to length and tape several pieces together to create arms and hair.

- Insert posy pics into the points where you want the arms and the hair go. Fill with a little royal icing and push the arms and hair into place.
- If the black parts are a little dusty you can paint them with isopropyl alcohol if you have some, or clear alcohol if not, just to remove all the marks.
And there you have it – one flipping cool Olaf cake, which will make you super popular with your children…at least until the next Disney craze comes along!

Related Posts