- Stats: 77514 11
- Author: Partyrama
- Posted: 21st October 2015
- Category: Food & Drink
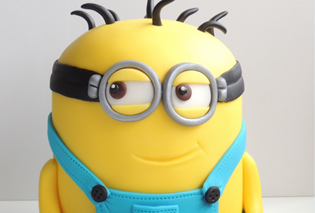
How to Make a Minion Birthday Cake
Guest contributor Caroline Day of CakeLush shares with us her step by step guide to making this amazing Despicable Me inspired minions cake.
You might try, but there is no avoiding these cute yellow fellows: Minions are everywhere! Tall or small, with one eye or two, these cute little creations have taken the world by storm. Rocking their dungaree workwear complete with boots, gloves and goggles, Minions are born to serve whichever evil genius they latch onto.
So, just like a Minion – loyal, eager to please and with a childish sense of humour – I’m going to show you how I make my Minion party cake with this step-by-step guide. It’s the perfect centrepiece for a Minions party, themed with our Despicable Me birthday party supplies.
Making the features:
Decorating ingredients:
- 750g yellow fondant
- 250g black fondant
- 250g blue fondant
- 250g white fondant
- 25g brown fondant
- Silver edible lustre powder
- Small tub of edible glue
Tip: Wrap any unused fondant tightly in food wrap and put in a sealable food bag or plastic tub to prevent it drying out.
The gloves, boots, goggles, eyes and hair will need to be made at least 24 hours before you want to attach them to the cake as they need to dry and hold their shape. You can make them before then – just make sure you store them in a cardboard cake box rather than an airtight container so they don’t sweat.

Roll out some black fondant on a non-stick surface, dusted lightly with corn flour if necessary.
For the boots:
Cut out three ovals – two for the boots and with third one cut off both curved ends to make the heels. Stick the heels, using edible glue to the oval shapes at the bottom to create a boot shape and set aside on a piece of greaseproof paper to dry.
For the gloves:
I have used a flower cutter to cut out two shapes and then removed three petals, but if you haven’t got one you can either make a cardboard template or mould them by hand. Leave them to dry with the boots.

For the hair:
Roll a sausage of black fondant, then thin it down on one end and trim it off. You’ll need about 9 of them. Leave them to dry too.

For the goggles:
Mix a small amount of black fondant with some white to make grey (I always have white fondant to hand to make up my own colours or so I can make my shop-bought colours go a bit further!).
Take two round cutters about 3cm and 2½cm in diameter. I’ve used a cookie cutter and a nozzle for this. Using the larger cutter, cut out two circles and allow them to dry for about 10 minutes to help them keep their shape if you’ve got the time. Next, cut out the middle with the smaller cutter. Roll a piece of fondant to create two large baked bean-shaped pieces and score them across the middle to make the goggle fasteners.
Add a touch of metallic shimmer by dusting them with edible silver lustre dust if you have any. If not, don’t worry.

For the eyes:
Take the same cutter you used for the middle of the goggles, cut out two white circles for the eyes and two yellow circles for the eyelids.
Trim off two curved ends for eyelids and attach to the white circles. Using a small circle cutter or your fingers, roll or cut two smaller circles of brown fondant for the iris and two smaller balls of black fondant for the pupils. Build up the eyes looking in, out, up, down, or even crossed and add a small dot of white to add a bit of light. The eyes can be used to create different expressions so it’s really up to you which way they are looking.
Now to make the cake.
Making the cake:
Vanilla sponge ingredients:
- 250g unsalted butter, softened
- 250g caster sugar
- 250g self- raising flour
- 4 large eggs, free range
- 1 tsp vanilla extract
Vanilla buttercream ingredients:
- 250g unsalted butter, softened
- 500g icing sugar
- 1tsp vanilla extract
For the vanilla sponge:
Preheat your oven to 160°C fan (or 180°C/gas mark 4).

You will need four round cake tins of 4” in diameter, greased and lined with greaseproof paper.
Cream together the sugar, butter and vanilla extract until pale and fluffy using a stand mixer or electric hand mixer. Then add one egg at a time with a spoonful of the flour to prevent it curdling on medium speed. Finally, add the rest of the flour on low speed until it’s all combined but be careful not to over-mix it!
Divide the mixture into the four tins and bake in the oven for approximately 25 minutes or until golden and the top of the sponge springs back when you press it!
When ready remove the tins from the oven and allow them to cool completely on a cooling rack.
For the vanilla buttercream:

Mix up the butter, icing sugar and vanilla extract in your mixer until light and creamy but firm enough to stick to an upturned spoon. Adding a couple of tablespoons of hot boiled water can help if you’re struggling for the right consistency. Remember to start on a very slow speed and gradually increase or you may find there is more icing sugar outside the bowl than inside! If you have a splatter guard that you can use, even better.
Trimming and assembling the sponge body:

Trim the tops off three of your cakes so they are flat and about equal depth and trim around the edges of one of them to create a domed look.

Add a layer of buttercream to the top of your first sponge and build your Minion body upward in the same way with the domed sponge on the top. Put it in the fridge to chill out for a bit and firm up so it doesn’t slide around when you want to coat it – about 20 minutes should be fine.
Afterwards, cover your Minion skeleton in a layer of buttercream using a palette knife. This not only gives you a smooth surface but traps all the crumbs (that’s why it’s often called a crumb coat) and also another delicious layer to keep the sponge from drying out.
Ready to bring your creation to life?

Roll out your yellow fondant and cut a rectangle long enough to go round your cake. Dust it lightly with corn flour and loosely wrap it around your rolling pin. Starting at the back of your cake, wrap the fondant around it slowly until you’re back where you started. You can then trim off the excess. Smooth the fondant with your hands or a cake smoother to remove any air bubbles. Cut out a 6” circle of fondant to cover the head. Smooth and trim as before and don’t worry about the join, which will be covered by the goggles!

Attach the eyes using edible glue and set them facing in your chosen direction so about a third of them are above the seam line. Place the goggles over the top, making sure you’ve left enough space between the eyes for them.
Roll out your black fondant and cut a strip just under 2cm wide. Attach it around your Minion from goggle to goggle and voila, the seam has gone! Finish them off by adding the fasteners each side.
For the dungarees, roll out a strip of blue fondant about the width of a ruler and attach around the base of the cake. You can create a stitching effect using a cocktail stick, which is a nice extra detail.

Roll some more blue and cut out a rectangle for the front and an elongated trapezium for the back. They don’t have to be exact as they are meant to look like fabric – you’ll need to judge the size needed depending on how tall your sponge worked out.
Attach the panels top and bottom and add the stitching detail if you want. You can also add half an oval for a front pocket.

Place the gloves you made earlier on each side of the body before rolling out a yellow fondant sausage and cutting it in half. Smooth the ends and attach them to the gloves and the body. Remember that the Minions’ arms are quite low – about halfway down the body – and use edible glue to attach them. Water won’t be strong enough to hold the heavier pieces.
Roll out a thicker sausage in the blue fondant and cut it into two pieces for the legs. Set them against the body at the edges of the dungarees, attach using edible glue and add the boots in the same way.
I’ve added some buttons for extra detail on the dungarees too.

It’s the eyes and the smile that give your Minion its own character. I like to create the smile (or maybe it’s a smirk, depending what it’s been up to) in the opposite direction to where it’s looking.
Mark gently where you want the smile to be and gradually enhance it using a cocktail stick until you’re smiling too.

Mark out where you want the hair on your follicly-challenged creation and add in the tufts using a tiny bit of edible glue. Push in firmly but be careful not to break them.
Finally, you can add an extra detail – BANANA!
Making the banana:

A simple yellow ‘sausage’ of fondant and two blobs of brown fondant and you can create the Minions’ catnip! Set it to dry in a banana shape and use an edible ink pen to create the markings on the banana if you wish.
And there you have it: your own marvellous Minion. Now, can you bring yourself to eat him?

Related Posts