How To Build A Raspberry Pi Ikea Retropie Arcade Table
The Ikea Raspberry Pi arcade table is an awesome way to hack the Ikea Lack series of living room furniture into a fully functioning plug and play retro arcade system. It requires only a basic knowledge of computing and woodwork, and makes for a stunning centrepiece for any living room, as well as being a bundle of fun for you and your family!
What is a Retropie Ikea Table?
The concept is simple – the joystick and buttons are fixed into the Ikea table, and are connected via USB to a tiny Raspberry Pi computer which runs the RetroPie software. RetroPie is a retro console and arcade game emulation software that covers almost every old system dating back to early arcade games like Donkey Kong and Space Invaders, all the way up to the original Sony Playstation and Sega Dreamcast. Best of all, it’s completely free to download! You can download the files necessary for the installation here.
The games (known as ROMs) are installed via USB stick to the Raspberry Pi, and then can be played back on your TV via HDMI. We won’t show you where to get the ROMs from (legally you should own the game to be able to use a digital copy), but there are plenty of online resources to explain more on that subject (Google is your friend!).
So without further ado, let’s get started!
In order to make the system, you will need the following items:
- Ikea Lack TV Stand – Buy from Ikea
- Raspberry Pi 3 Starter Kit – Buy on Amazon
- Reyann 2 Player LED USB Arcade Stick & Buttons Kit – Buy on Amazon
- Hole Saw Set – Buy on Amazon
- Velcro Squares – Buy on Amazon
- M3 x 16mm Slotted Countersunk Screws (4 per arcade stick) – Buy from Westfield Fasteners
- HDMI Cable – Buy On Amazon
- Masking Tape
- Pencil
- Drill
- Screwdriver
- USB Stick
- USB Keyboard / Gamepad
- Stanley Knife
- Computer with SD Card Reader
- Eye Protection (for use when drilling!)
Optional Extras:
- HDMI & USB Flush Mount For Car/Boat – Buy on Amazon
- Dual USB Flush Mount For Car/Boat – Buy on Amazon
- Micro USB to USB Adapter – Buy on Amazon
- 2 x Retro USB SNES Controllers – Buy on eBay


Configuring Your Raspberry Pi With RetroPie
The first thing that you need to do before getting into the hands on modification of the Ikea table, is to configure your Raspberry Pi and install the software. By setting it up and making sure it works before you fix it into your table, it means yo will avoid any headaches and can simply plug and play once the table has been put together.
Installing the Retropie software onto your Raspberry Pi is fairly straightforward. We recommend that you watch the excellent video by TechTipsta below to get yourself familiar with the process – this will ensure that not only you get your Pi set up properly, but you will also have a better understanding of how the software works and the various options contained within the menus.
The video covers:
- Downloading the software
- Formatting the SD card
- Installing the software
- Configuring the keyboard / gamepad
- Preparing the USB stick for ROM installation
- Installing ROMs
Once you have your Pi set up and ready to play, we can get into the fun part of preparing your Ikea table!
Preparing The Table
Once you have removed all of the packaging from the Ikea Lack TV bench, the first thing to do is cover the top surface of the table with masking tape. We do this for two reasons – the first being so that you can mark on where you will be drilling your pilot holes on the surface in pencil, and the second is to stop the wood from splitting when drilling the holes. You don’t need to go too crazy with the tape – a couple of layers across the top will do the job nicely. If you are also planning on installing USB and HDMI ports on the back using the Flush Mount adaptors, don’t forget to add some tape to that side also!

The next step is to create a stencil, which you can then use to mark out where your joystick and buttons will be in pencil. The website Slagcoin has a huge list of different arcade stick and button layouts that you can print out and use – check them out here. Pick an 8 button layout that you like the most, print it out, and then you can begin creating your stencil.
We used some of the cardboard packaging left over from the Ikea table, and then used the pencil to mark holes through the printed paper and into the cardboard. Make sure you measure precisely where on the table your controls will be, making sure not to have them too close to the edges. Once you are happy with the stencil and the layout, force the pencil through the cardboard and mark the table with dots.
There are still a few buttons that need marking out, and where you position these is entirely up to you – with your Reyann arcade stick and buttons you will notice that there are four smaller buttons – these are for start/select or as player 1/2/3/4 buttons. We measured these out and put them in the middle on the front of the table, along with space for the USB flush mount. Our additional USB/HDMI flush mount adaptor we put on the back, as these will connect to the power and TV respectively.
Once you have finished marking out the layout of your buttons on the masking tape, draw X’s precisely over the dots to assist with drilling.

Cutting The Holes
Before you start drilling the large holes for your buttons to fit through, you must drill pilot holes to ensure that the hole saw drill bits stay in the right place and drill accurately. Using a drill with decent power (our cordless Bosch wasn’t up to the task but our corded Guild hammer drill was great!) and a regular wood drill bit, drill into the table on the X’s you marked out earlier. Don’t forget your dust mask and eye protection!


Once your pilot holes have been drilled, you can now begin using the hole saw bits to drill the holes out. Make sure you use the correct drill bits for the right holes – the 29mm bit is for the eight standard buttons (and the USB/HDMI flush mount adaptors should you choose to use those), the 25mm bit is for the four start/select buttons, and use the 22mm bit for the two joystick holes.

Once you have drilled the holes out, carefully remove the masking tape from the top of the table. The final piece of drilling you will need to do is for the screws to fix the joystick to the table. Place a few layers of masking tape over the joystick holes, then unscrew the metal stencil from the top of the joystick, and use this to mark out the four holes you will need to drill.

Using a thin drill bit (making sure it is smaller than the M3 screws), drill some small holes into the X’s and carefully remove the masking tape! Your drilling is now complete.

Now you have finished the drilling, turn the table over and using the legs, mark out where the legs will go in pencil. You can then mark out a section on the bottom to cut out to access the holes using pencil and a ruler, and carefully score these lines with a Stanley knife multiple times until the wood becomes easy to cut through. Cut out this access hole in the bottom and clear out the cardboard to reveal the holes you have drilled, and where necessary cut a few additional pieces away to ensure that you can access all of the holes easily.

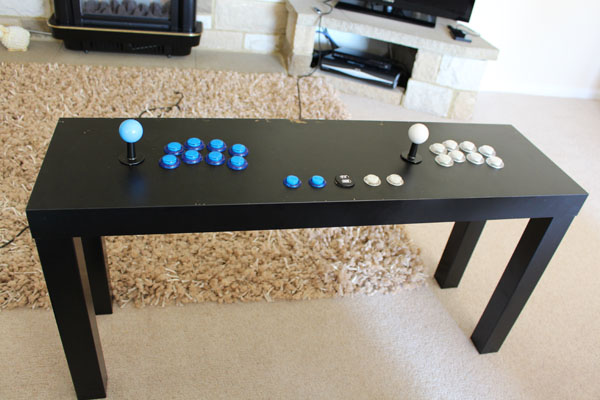
Clean out the dust and remaining cardboard inlay to expose the holes and your table will look like the image below. You are now ready to start fitting the controls to the table.

Installing The Buttons & Joysticks
Remove all of the buttons from their packaging and wire them up like the image below, making sure you take note of the indicator in the centre which tells you the correct way up to have it. This documentation should also be contained within the box containing the buttons, however in case it isn’t, use the images below for reference:


In order to fit the joystick, feed the stick through the hole you created in the table from the bottom, and holding it firmly in place with your hand underneath, screw four of the M3 16mm screws into the holes, holding the joystick in place. It doesn’t matter which way up you have the joystick, as you configure the directions and button presses within the Retropie software. This step can be a little tricky, but a good tip is to screw one in, then do the screw on the opposite side. This will hold the stick firmly in place making the additional two screws much easier to fit.

You can now screw the balls on top of the arcade sticks as below. You will notice that they don’t fully screw on and become stationary – they are meant to swivel so this is ok!

Now your joystick is fitted, you can now begin fixing your buttons through the holes of the table. Slide each button in from the top, then use the plastic nuts supplied to tightly screw and fix the buttons to the table.

If you are adding the USB and HDMI flush mount adaptors, now is the time to screw them in also. This process is much the same as the buttons, and you will need to feed the plastic nut along the cables to reach the adaptor itself to screw it in. Screw these in tightly, taking care that the USB and HDMI ports are facing the way you want them to on the outside of the board.

Connecting The Joysticks To The Raspberry Pi
Once all of the controls are fitted to the table, now we can connect them to the Zero Delay USB controller boards supplied. Starting with the left hand side, plug the wires into the boards as per the diagram supplied. The order that you fit the buttons to the board doesn’t matter, as these will be configured within the software. Once all the controls for the left hand side are connected to a board, you can stick a square of velcro to the back of it, and neatly fix this to the underside of the table. Repeat this process to connect the controls on the other side of the table.


Using the supplied wires (and following the diagram), you can now connect the Zero Delay boards via USB to your Raspberry Pi. If you are also using the flush mount adaptors for USB and HDMI ports, now is the time to connect these. The two USB ports on the top of the board will fit into the remaining two USB slots on your Raspberry Pi, the HDMI connector will fit into the HDMI connector, and the USB power port will need to be connected to the Micro USB to USB adaptor, which can then fit into the micro USB power slot on the Raspberry Pi. You can then use some velcro to attach the Raspberry Pi neatly to the underside of the table, and use the inside of the table to hide away the excess cables and stop them from dangling down once the table has been completed and is upright.

Finishing Building The Table
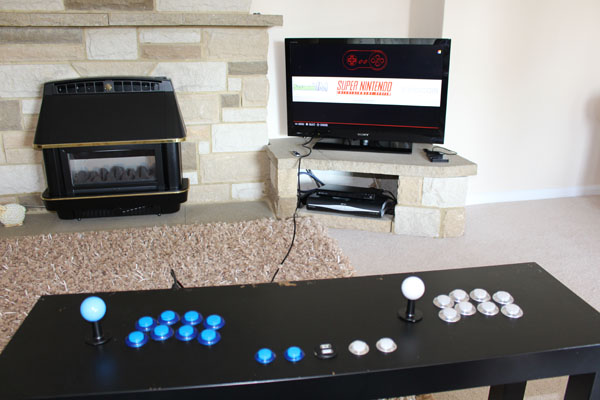
Now all of the controls have been successfully fitted, and the Raspberry Pi has been installed, you can now finish off building the table as per the Ikea Lack instructions – If you don’t have the instructions to hand, you can download the PDF from IKEA here. We decided not to add the bottom shelf to our table, in order for us to be able to fit out legs underneath and to also have easy access to the controls should something go wrong in future, but whether you choose to do this or not is entirely up to you!
The Moment Of Truth – Testing
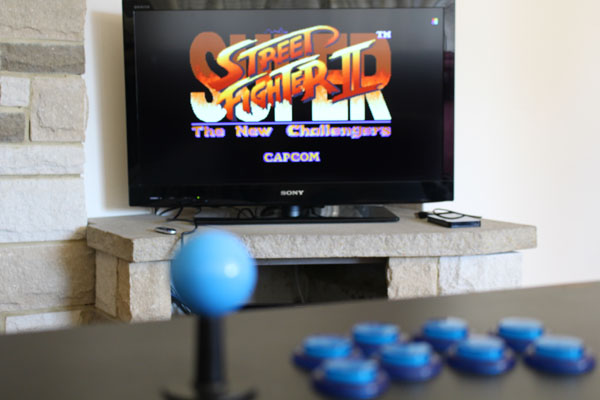
Now your table is complete and standing upright, you can now connect your Raspberry Pi to the TV and power it up. If all has gone to plan, the Pi will run the Retropie software as before and you will now be able to configure your joysticks the same way that you configured your keyboard/gamepad in the video at the beginning of the article. Load up your favourite game and enjoy – you’ve done it!

Summary
You should now have a fully functioning arcade table, loaded with your favourite classic retro games and ready to use! We’ve been loving battling it out on classics like Street Fighter 2, Tetris, Lemmings, Donkey Kong, Super Mario and Pacman. While it’s not the cheapest project to undertake (all in all it cost us around £130 for all the bits), it’s certainly not a bank breaker and it is a real talking point when people come to visit. We love it and hopefully you will too – why not give it a go and re-live some of your childhood gaming memories.


We’d like to give credit to the wonderful guys over at Element14 for the original concept of this table! If you enjoyed this article please feel free to share with your friends and family, and if you build your own we’d love to see it! Send us a message to blog [at] partyrama.co.uk and send us your pictures on social media!
Related Posts